PhotoScape X for Mac is photo viewing and editing software designed for Mac OS X.
Key Features
- Editor:
Rotate, Straighten, Resize, Crop, Border, Color Adjustment, Color Temperature, Film Effect, Auto Level, Auto Contrast, Backlight Correction, Bloom, Vigentting, Sharpen, Blur, White Balance, Curves, Levels, Color Balance, Sepia, Grayscale, Black & White, Negative, Text Object, Image Object, Paint Brush, Effect Brushes, Mosaic Brush, Red Eye Correction, Clone Stamp.
- Batch:
Batch edit multiple photos.
- Viewer:
Photo Browser, Full Screen Viewer, Batch Rename, Batch Resize, Batch Format Change, Lossless Roate, Share (Email,Twitter,Facebook,Picasa,Flickr), Exif Viewer.
- Share:
Sharing on Social Networks: Facebook, Twitter, Picasa, Flickr.
- Full Screen:
See your photos in full-screen view or as a slide show.
- Collage:
Merge multiple photos on the collage frame to create one final photo.
- Combine:
Attach multiple photos vertically or horizontally to create one final photo.
- GIF Creator:
Create Animated GIF.
- Screen Capture:
Capture your screenshot and save it.
- Color Picker:
Zoom in on images, search and pick a color.
- Rename:
Change photo file names in batch mode
- Themes:
Support multiple themes. Basic, Gray, Vintage, Black, Neon & Pastel.
PhotoScape X is free software. We are dedicated to listen to user feedback and improve the quality of PhotoScape X and user experience. If you are a Windows user, please download PhotoScape for Windows. For editing videos on Mac, check out VideoBlend for Mac - a free video editor and player.
PhotoScape X for Mac is photo viewing and editing software designed for Mac OS X. To install Photoscape X on your Mac, click the Free Download button below.
:: Free Download from download.cnet.com
Version 1.8 (33.5MB) Updated August 28th, 2014
- New features: 'Shape', 'Pattern', 'Sticker' and more. Version History
PhotoScape X is free software. This software is Mac OS X compatible. (10.6: Snow Leopard, 10.7: Lion, 10.8: Mountain Lion, 10.9: Mavericks, 10.10: Yosemite)
It currently lacks some of the functionality available in our Windows version. We are working diligently to increase functionality to that of the Windows version. We are dedicated to listen to user feedback and improve the quality of PhotoScape X and user experience.
VideoBlend for Mac is a free video editor and player designed for Mac OS X.
Key Features
- Split:
Trim, split and combine video clips.
- Transcode:
Change video formats, resolution, and quality.
- Download:
Save video clips from Youtube and Vimeo to your computer.
- Effects:
Add various effects to your video.
- Add Music:
Add and edit background music.
- Rotate:
Rotate video clips 90 degrees to any orientation.
- Watermark:
Add various text or image watermarks on video.
- Volume Control:
Adjust audio levels.
- Extract Audio:
Extract audio from video clips and save to MP3, OGG, WMA and WAV files.
- Create GIF:
Trim video clips to create animated GIF files.
- Player:
Play Videos.
- Themes:
Support various themes.
VideoBlend is free software. Send questions, suggestions or feedback to videoblendteam@gmail.com For editing photos on Mac, check out PhotoScape X for Mac - a free photo viewer and editor.
Designed to be intuitive, VideoPad is a fully featured video editor for creating professional quality videos in minutes. Making movies has never been easier.
Drag and drop video clips for easy video editing
Apply effects and transitions, adjust video speed and more
One of the fastest video stream processors on the market
Get it Free. A free video editor version is available for non-commercial use only. If you will be using it at home you candownload the free version here.
Edit video from any camcorder Capture video from a DV camcorder, VHS, webcam, or import most any video file format including avi, wmv, mpv and divx.
Full of transitions and visual effects Over 50 visual and transition effects to add a professional touch to your movies.
Create videos for DVD, HD, YouTube and more Burn movies to DVD for playback on TV, or as a standalone video file to share online or put on portable devices.
---
Stunning Video Transitions and Effects
Choose from a wide range of video clip transitions
3D video editing and 2D to 3D stereoscopic conversion
* During installation of this download you will be given the option to install closely related programs from the NCH Software suite. These are optional and you can select what you want depending on your requirements.
Supported Input Formats
VideoPad supports just about any video input device including DV based or HDV camcorders.
Import Video - avi, mpeg, wmv, divX, Xvid, mpeg, mp4, mov, vob, ogm, H.264, RM and more
Import Images - bmp, gif, jpg, png, tif and more
Import Audio - wav, mp3, m4a, mid, flac, aac, wma, au, aiff, ogg, raw, dvf, vox and more
Supported Output Formats
Burn to Disc - DVD, CD, Blu-ray or HD-DVD
Export Video File - avi, wmv, mpg, 3gp, mp4, mov, YouTube, iPod, PSP, Mobile Phone
Upload to YouTube - save your login credentials to upload videos directly to YouTube, Facebook or Flickr from VideoPad
Soundflower is a OS X system extension that allows applications to pass audio to other applications. Soundflower is easy to use, it simply presents itself as an audio device, allowing any audio application to send and receive audio with no other support needed. Soundflower is free, open-source, and runs on Mac Intel and PPC computers.
Example: To send audio from iTunes to Max/MSP, open the System Preferences and select Soundflower (2ch) as the device for sound output inside the Sound panel. Then, inside Max/MSP's DSP Status Window, select Core Soundflower (2ch) as the input device. All output of iTunes should now be sent to Max/MSP's adc~ object.
Your Mac is capable of producing sound as well as playing sound channeled from outside sources—devices plugged into the Mac’s USB- and sound input ports as well as audio streamed from the Internet. Wouldn’t it be great if you could captures some of those sounds for later listening? You can. And you can for free with Soundflower. Here’s how it works.
Step 1: Download Soundflower
The first step involves finding a way to grab audio playing in one application—a Web browser, for example—and route it to an application that can capture that audio. Cycling ’74’s free Soundflower is that way. Soundflower is a system extension that lets you channel audio from one application to another. For example, you can take the audio playing from a movie in your Web browser and channel it into QuickTime Player’s audio input where you then record it.
Step 2: Configure Soundflower
After you’ve installed Soundflower launch the Sound system preference and you’ll see evidence of Soundflower in the Output and Input tabs. Select the Output tab and choose Soundflower (2ch). Do this and any sound that would normally come out of your Mac’s speakers is now routed through Soundflower.Any is the key word here. If your Mac makes any sound—not just the sound you’re trying to capture but also e-mail and Twitter alerts, for example—it will route that too.
Step 3: Configure your capture application
You have a couple of applications on your Mac that can capture Soundflower’s audio—QuickTime Player and GarageBand. To configure QuickTime Player choose File -> New Audio Recording. In the Audio Recording window that appears click on the downward-pointing triangle to the right of the Record button. From the menu that appears choose Soundflower (2ch). When you’re ready to begin your capture, just click Record.
You set up GarageBand by launching the application and in the New Project window that appears choosing Acoustic Instrument. This creates a GarageBand project that contains a single digital audio track. Use the default tempo and time- and key-signature settings that appear in the New Project Template window and click the Create button. Open GarageBand's preferences, select the Audio/MIDI tab and from the Audio Output and Audio Input pop-up menus choose Soundflower (2ch). Close the Preferences window. If the Info pane for the track doesn’t appear, choose Track -> Show Track Info. In the Browse tab of the Info pane choose Stereo 1/2 Soundflower (2ch) from the Input source pop-up menu. When your Mac makes sound you should see it register in the track’s meters. Click Record to capture the audio.
Step 4: Monitor the Mac’s sound
When you choose Soundflower as your Mac’s audio output you can no longer hear it through attached speakers or headphones. In order for you to monitor what’s happening, launch the Soundflowerbed application (found in /Applications/Soundflower). Click the Soundflowerbed menu bar item that appears and choose your speakers or headphones from the menu. Now, not only will your audio application capture what your Mac plays, but you’ll be able to listen to the source audio as well. (You may want to do this before setting up QuickTime or GarageBand to capture your audio, but that's up to you.)
Again, any sound your Mac makes will be channeled through Soundflower so you’ll want to disable alert sounds or quit those applications that make them. Additionally, if you change your Mac’s volume, that change will be captured by the application that’s recording Soundflower’s sound. So, lay off the volume and mute controls.
Sublime Text is a sophisticated text editor for code, markup and prose.
You'll love the slick user interface, extraordinary features and amazing performance.
---
---
Download
The current version of Sublime Text 2 is 2.0.2. Sublime Text 3 is currently in beta, and contains many improvements over Sublime Text 2.
Sublime Text 2 may be downloaded and evaluated for free, however a license must bepurchased for continued use. There is currently no enforced time limit for the evaluation.
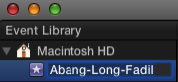
Notice that in the panel “Event Library”, there is an item “Macintosh HD”. It refers to the local hard disk of the computer.
Before performing video editing, you need to create Event and import media files into it.
4) Add Event
By default, Final Cut will create a start up Event for you. However you can add more events to your Hard Disk.
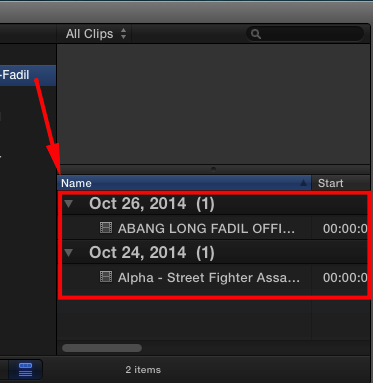
For this tutorial, we will create an Event called Abang-Long-Fadil.
You can perform this in any of the following method:
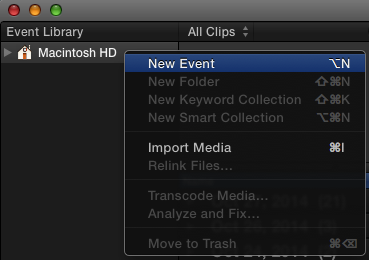
a) Select the item “Macintosh HD” and 2-Finger-Tap your trackpad (or Right-Click your mouse or Press CONTROL button and left-click your mouse) (Hereafter I will just call this Control-Click) and select New Event.
b) Go to Menu Bar. Select File/New Event.
In practice, Method (a) is faster.
5) Import Media
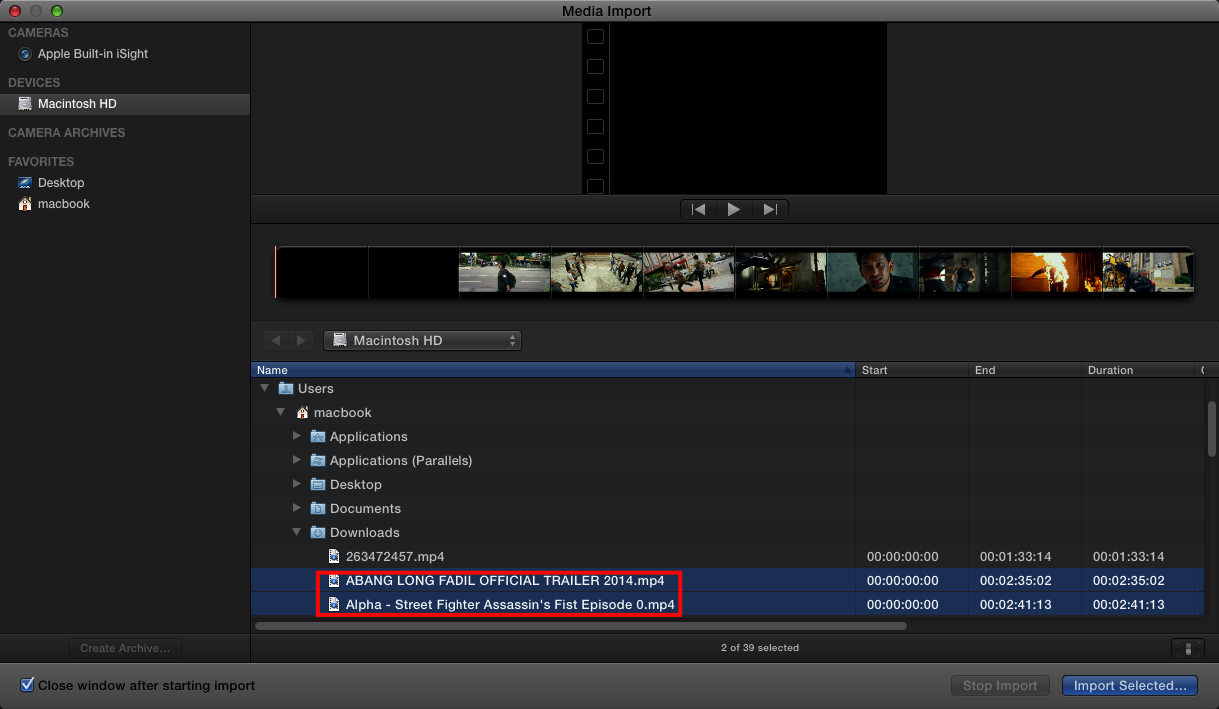
5.1) Select the Event “Abang-Long -Fadil”, Control-Click and select Import Media.
Select both movie clips and click Import.
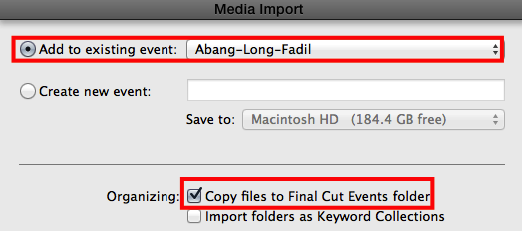
Select the two options below and click Import.
As a result, the movie clips are displayed in the Clips Panel.
Don’t bother the date because it is not relevant.
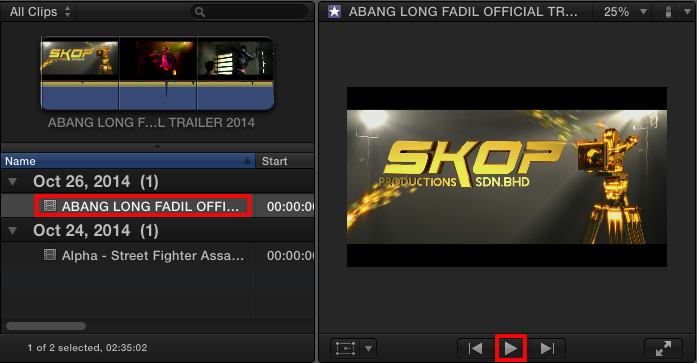
6) View the clip.
6.1) Select the clip and click the Play Button in the Preview Panel.
7) Create a new Project
7.1) Go to Project Library Panel and click the + icon.
7.2) Enter the project name “Abang-Long-Fadil-StreetFighter-Version”
7.3) Outcome.
8) Insert Clip into the project Story Line
8.1) Select the movie clip “Abang Long Fadil…” in the Clip List, drag it into the Project Story Line and drop it there.


 VideoBlend for Mac


 PhotoScape X for Mac